Before you start your android program to demonstrate the registration form, you must have one website (either your own or a free website). You can create a free website on 000webhost.com by logging in using either your Facebook account or gamil account. Once you create a website, it allows you to create a database and tables. In the dashboard, select tools, select database to create a database, and once the database is created click on Manage and select MyphpAdmin. It will take you to the page where you can create a table. Create a table named UserLoginTable with five attributes namely, email, name, contact, address, and, password.
Under Tools, select file manager, click on upload files, open public_html folder and create two php files namely, DatabaseConfig.php and UserRegistration.php. Code for both php files are given below.
DatabaseConfig.php
<?php
     $host="localhost";
     $user="TYPE YOUR DATABASE USER NAME";
     $pass="TYPE YOUR DATABASE PASSWORD";
     $db="TYPE YOUR DATABASE NAME";
     $con= new mysqli($host,$user,$pass,$db) or die("ERROR:could not connect to the database!!!");
?>
UserRegistration.php
<?php
    include 'DatabaseConfig.php';

    $email = isset($_POST['email']) ? $_POST["email"] : '';;
    $name = isset($_POST['name'])? $_POST["name"] : '';;
    $contact = isset($_POST['contact']) ? $_POST["contact"] : '';;
    $address = isset($_POST['address']) ? $_POST["address"] : '';;
    $password = isset($_POST['password']) ? $_POST["password"] : '';;

    $Sql_Query = "INSERT INTO UserLoginTable (email,name,contact,address,password) values ('$email','$name','$contact','$address','$password')";

    if(mysqli_query($con, $Sql_Query)){
	   echo "Success";
    }else{
       echo mysqli_error($con);
	   echo "Failed";
   }
   mysqli_close($con);
?>
Step 1: Start an android project.
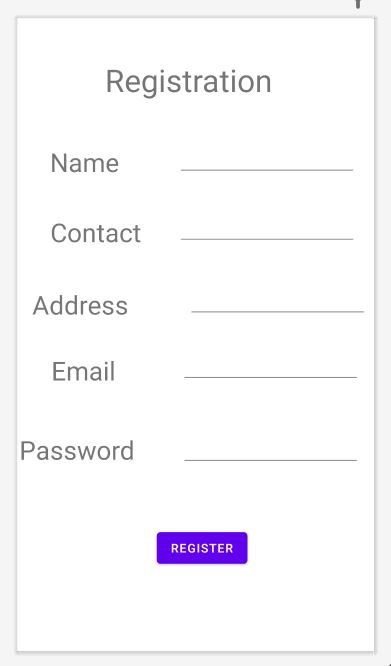
Step 2: Design the first page as shown in the figure.

Step 3: Open the AndroidManifest.xml file and add the following line after the application tag.
<uses-permission android:name="android.permission.INTERNET" />
Step 4: Open build.gradle(Module:………..) file, inside dependencies, add the following code and synchronize the project.
implementation 'com.android.volley:volley:1.1.1'
Step 5: Create a second page and design it with one textview to display a message “Registration Successful”.
Step 6: Open MainActivity.java and add the following code.
package com.example.testing_registration_demo;

import androidx.annotation.Nullable;
import androidx.appcompat.app.AppCompatActivity;

import android.os.Bundle;
import android.view.View;
import android.widget.Button;
import android.widget.EditText;
import android.widget.Toast;

import com.android.volley.AuthFailureError;
import com.android.volley.Request;
import com.android.volley.RequestQueue;
import com.android.volley.Response;
import com.android.volley.VolleyError;
import com.android.volley.toolbox.StringRequest;
import com.android.volley.toolbox.Volley;

import java.util.HashMap;
import java.util.Map;

public class MainActivity extends AppCompatActivity {

    Button register;
    EditText Name, Contact,Address, Email, Password ;
    String Name_Holder, Contact_Holder,Address_Holder, EmailHolder, PasswordHolder;

    String webhost_path="YOUR_WEBSITE_URL/UserRegistration.php";

    @Override
    protected void onCreate(Bundle savedInstanceState) {
        super.onCreate(savedInstanceState);
        setContentView(R.layout.activity_main);

        //Assign Id'S
        Name = (EditText) findViewById(R.id.editText_Name);
        Contact = (EditText) findViewById(R.id.editText_contact);
        Address = (EditText) findViewById(R.id.editText_address);
        Email = (EditText) findViewById(R.id.editText_email);
        Password = (EditText) findViewById(R.id.editText_password);
        register = (Button) findViewById(R.id.btn_register);

        register.setOnClickListener(new View.OnClickListener() {
            @Override
            public void onClick(View view) {
                Name_Holder = Name.getText().toString();
                Contact_Holder = Contact.getText().toString();
                Address_Holder = Address.getText().toString();
                EmailHolder = Email.getText().toString();
                PasswordHolder = Password.getText().toString();

                register_User(Name_Holder,Contact_Holder,Address_Holder,EmailHolder,PasswordHolder);

            }
        });


    } // end of onCreate method

    public void register_User(String Name_Holder,String Contact_Holder, String Address_Holder,String EmailHolder, String PasswordHolder){
        final StringRequest stringRequest=new StringRequest(Request.Method.POST, webhost_path, new Response.Listener<String>() {
            @Override
            public void onResponse(String response) {
                try{
                    if(response.equals("Success")){
                        Toast.makeText(getApplicationContext(), "Registration Successful", Toast.LENGTH_LONG).show();

                    }else{
                        Toast.makeText(getApplicationContext(), response, Toast.LENGTH_LONG).show();
                    }
                }catch (Exception e){

                }

            }
        }, new Response.ErrorListener() {
            @Override
            public void onErrorResponse(VolleyError error) {

            }
        }) // End of final StringRequest stringRequest1 .......
        {
            @Nullable
            @Override
            protected Map<String, String> getParams() throws AuthFailureError {
                Map<String, String> params=new HashMap<>();
                params.put("email", EmailHolder);
                params.put("name", Name_Holder);
                params.put("contact", Contact_Holder);
                params.put("address", Address_Holder);
                params.put("password", PasswordHolder);
                return params;

            }
        };
        final RequestQueue requestQueue1 = Volley.newRequestQueue(MainActivity.this);
        requestQueue1.add(stringRequest);
    }
}
Step 7: Run the project.
