Android allows us to use google maps in our applications. Here, we will see how we can develop mapview program in android.
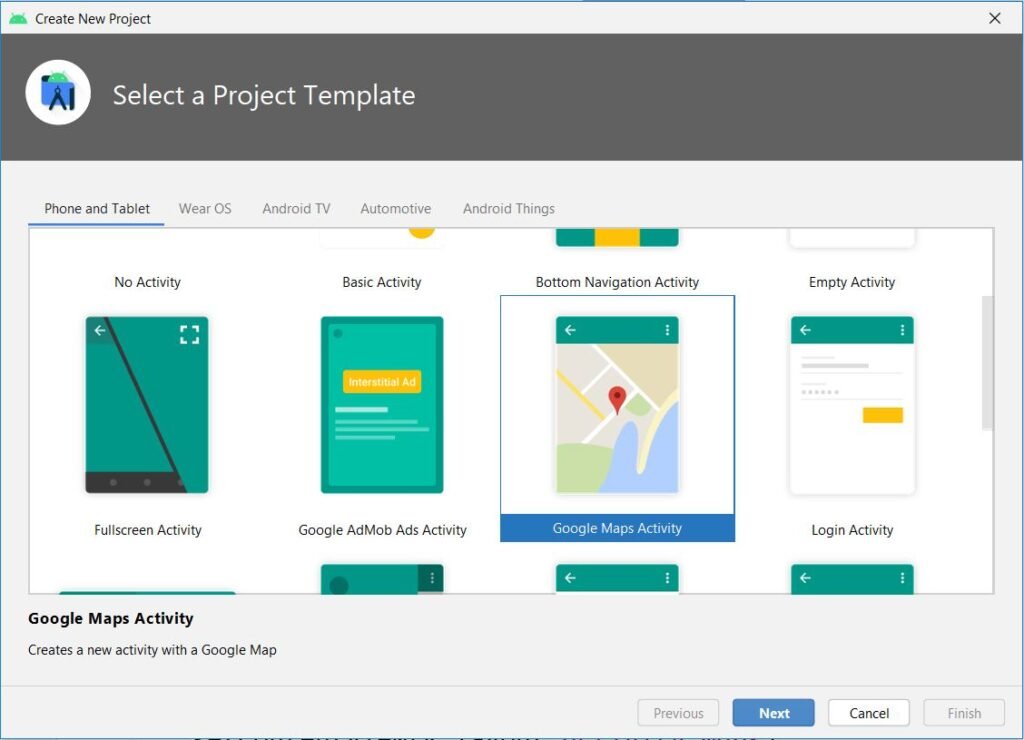
Step 1: Start a new project and select the project template Google Maps Activity.

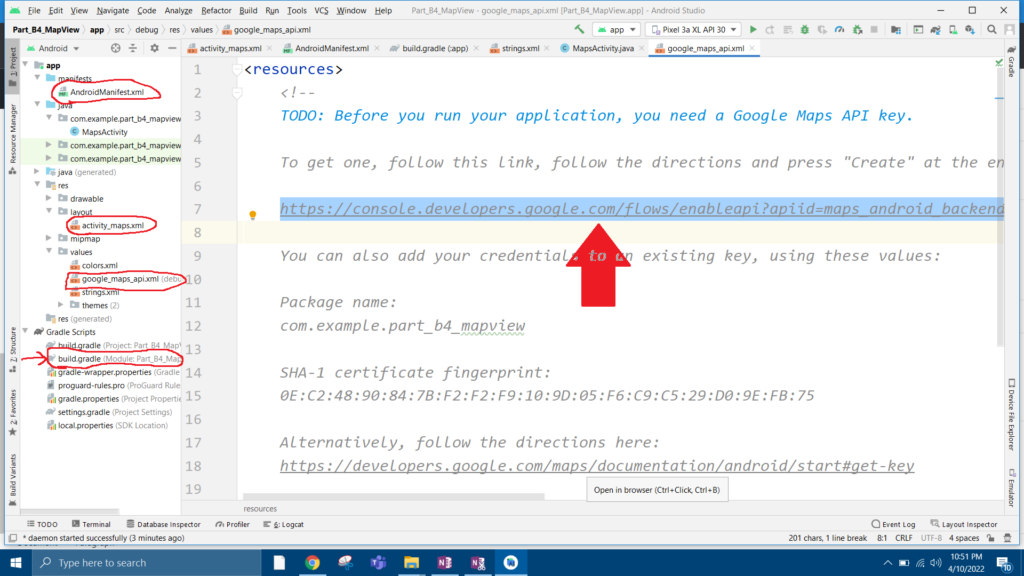
Step 2: Open google_maps_api.xml file, open the url https://console.developers.google.com/……………….. in a browser, login using your gmail account.

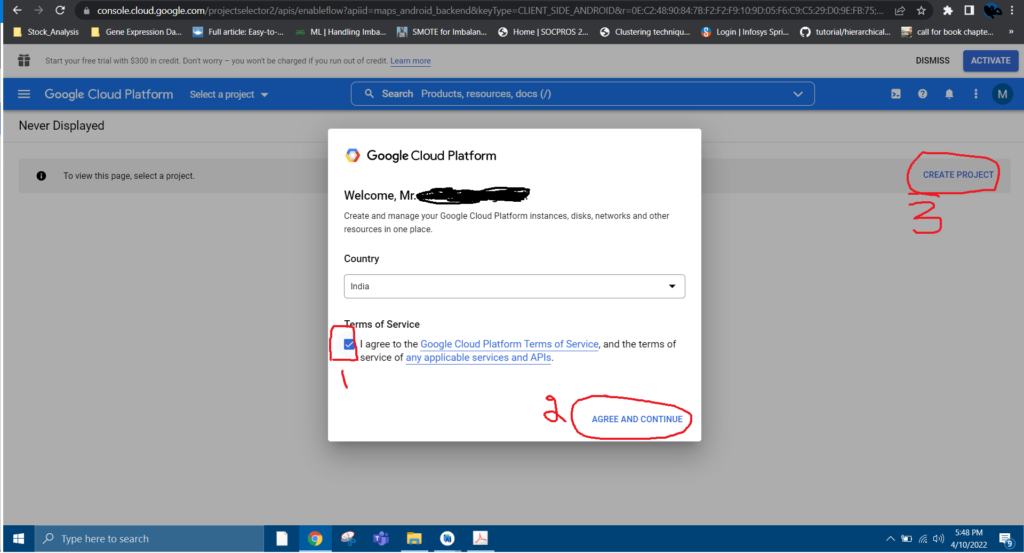
Step 3: Follow the instructions, agree to terms, and continue, click on create project.

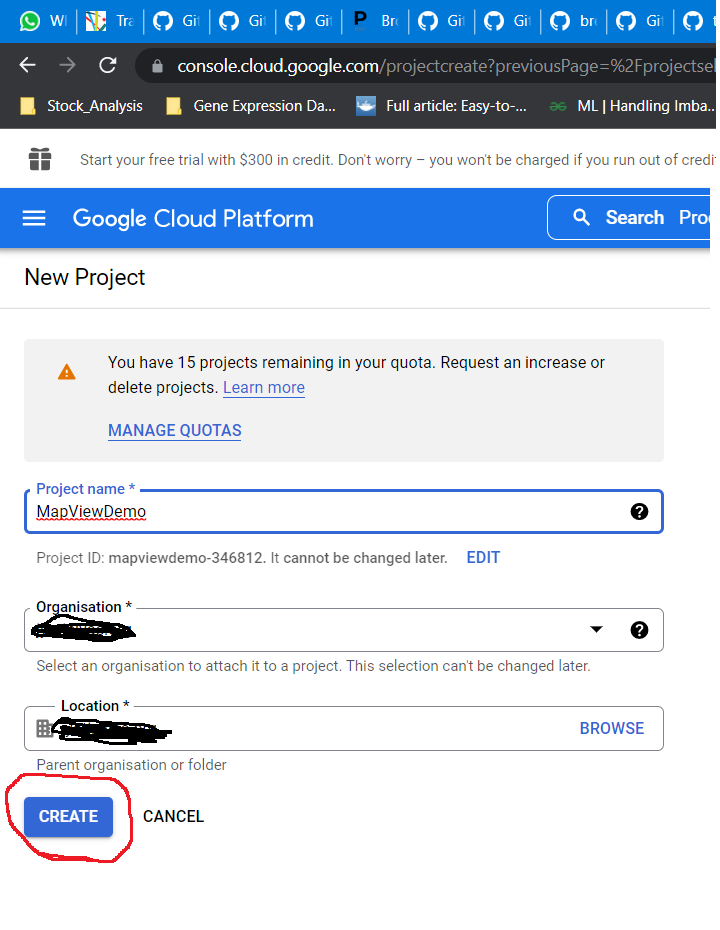
`Step 4: Give the project name and other details and click on create.

Step 5: Confirm the project, enable the API, and and click on CREATE NEW API KEY. New API key will be created, copy the key and paste it into the file google_maps_api.xml at the end in place of YOUR_KEY_HERE
<string name="google_maps_key" templateMergeStrategy="preserve" translatable="false">YOUR_KEY_HERE</string>
Step 6: Open build.gradle(Module), inside dependencies, at the end add the following code and click on synchronize.
implementation 'com.google.android.gms:play-services-location:17.0.0'
Step 7: Open AndroidManifest.xml file, and just before the application tag, add the following code
<uses-permission android:name="android.permission.ACCESS_FINE_LOCATION" />
<uses-permission android:name="android.permission.ACCESS_COARSE_LOCATION" />
<uses-permission android:name="android.permission.INTERNET" />
Step 8: Open MapsActivity.java file, you will that public class MapsActivity extends FragmentActivity implements OnMapReadyCallback will be there. Add LocationListener after OnMapReadyCallback. It will give error, goto the begining of the line click on the word public, one icon with drop down icon will appear. Click on drop down icon, and select implement methods. One window asking to select methods to implement will appear with some methods already being selected, click on OK.
Step 9: In the MapsActivity.java file, most of the codes are automatically generated. We just need to add the following line inside the OnMapReady method after the statement mMap = googleMap; This is done in order to provide a zooming feature in the map.
//Use following to display Zoom in/out +- symbols at corner
 mMap.getUiSettings().setZoomControlsEnabled(true);
Just before the last closing bracket, create a user-defined function searchLocation and write the following code.
public void searchLocation(View view) {
        EditText locationSearch = (EditText) findViewById(R.id.editText);
        String location = locationSearch.getText().toString();
        List<Address> addressList = null;

        if (location != null || !location.equals("")) {
            Toast.makeText(getApplicationContext(),"location ",Toast.LENGTH_LONG).show();

            Geocoder geocoder = new Geocoder(this);
            try {
                addressList = geocoder.getFromLocationName(location, 1);
            } catch (IOException e) {
                e.printStackTrace();
            }
            Address address = addressList.get(0);
            LatLng latLng = new LatLng(address.getLatitude(), address.getLongitude());
            mMap.addMarker(new MarkerOptions().position(latLng).title(location));
            mMap.animateCamera(CameraUpdateFactory.newLatLng(latLng));
            Toast.makeText(getApplicationContext(),address.getLatitude()+" "+address.getLongitude(),Toast.LENGTH_LONG).show();
        }
    }
Step 10: Design the page and run the project.
<?xml version="1.0" encoding="utf-8"?>
<fragment
    xmlns:android="http://schemas.android.com/apk/res/android"
    xmlns:tools="http://schemas.android.com/tools"
    xmlns:map="http://schemas.android.com/apk/res-auto"
    android:name="com.google.android.gms.maps.SupportMapFragment"
    android:layout_width="match_parent"
    android:layout_height="match_parent"
    android:id="@+id/map"
    tools:context=".MapsActivity">
    <LinearLayout
        android:layout_width="match_parent"
        android:layout_height="wrap_content"
        android:orientation="horizontal">

        <EditText
            android:layout_width="248dp"
            android:layout_height="wrap_content"
            android:id="@+id/editText"
            android:layout_weight="0.5"
            android:inputType="textPersonName"
            android:hint="Search Location" />

        <Button
            android:layout_width="wrap_content"
            android:layout_height="wrap_content"
            android:layout_weight="0.5"
            android:onClick="searchLocation"
            android:text="Search" />
    </LinearLayout>
</fragment>
The final code of the MapsActivity.java file is given below just for your reference
public class MapsActivity extends FragmentActivity implements OnMapReadyCallback, LocationListener
{

    private GoogleMap mMap;
    //Location mLastLocation;
    //Marker mCurrLocationMarker;
    //LocationRequest mLocationRequest;

    @Override
    protected void onCreate(Bundle savedInstanceState) {
        super.onCreate(savedInstanceState);
        setContentView(R.layout.activity_maps);
        // Obtain the SupportMapFragment and get notified when the map is ready to be used.
        SupportMapFragment mapFragment = (SupportMapFragment) getSupportFragmentManager()
                .findFragmentById(R.id.map);
        mapFragment.getMapAsync(this);
    }

    /**
     * Manipulates the map once available.
     * This callback is triggered when the map is ready to be used.
     * This is where we can add markers or lines, add listeners or move the camera. In this case,
     * we just add a marker near Sydney, Australia.
     * If Google Play services is not installed on the device, the user will be prompted to install
     * it inside the SupportMapFragment. This method will only be triggered once the user has
     * installed Google Play services and returned to the app.
     */
    @Override
    public void onMapReady(GoogleMap googleMap) {
        mMap = googleMap;

        //Use following to display Zoom in/out +- symbols at corner
        mMap.getUiSettings().setZoomControlsEnabled(true);

        // Add a marker in Sydney and move the camera
        LatLng sydney = new LatLng(-34, 151);
        mMap.addMarker(new MarkerOptions().position(sydney).title("Marker in Sydney"));
        mMap.moveCamera(CameraUpdateFactory.newLatLng(sydney));
    }

    @Override
    public void onLocationChanged(Location location) {

    }

    // USER DEFINED METHOD
    public void searchLocation(View view) {
        EditText locationSearch = (EditText) findViewById(R.id.editText);
        String location = locationSearch.getText().toString();
        List<Address> addressList = null;

        if (location != null || !location.equals("")) {
            Toast.makeText(getApplicationContext(),"location ",Toast.LENGTH_LONG).show();

            Geocoder geocoder = new Geocoder(this);
            try {
                addressList = geocoder.getFromLocationName(location, 1);
            } catch (IOException e) {
                e.printStackTrace();
            }
            Address address = addressList.get(0);
            LatLng latLng = new LatLng(address.getLatitude(), address.getLongitude());
            mMap.addMarker(new MarkerOptions().position(latLng).title(location));
            mMap.animateCamera(CameraUpdateFactory.newLatLng(latLng));
            Toast.makeText(getApplicationContext(),address.getLatitude()+" "+address.getLongitude(),Toast.LENGTH_LONG).show();
        }
    }
}
Step 11: Run the project.
